Community
  1. Community
  2. Mako Shark 2
  3. Mako/Maco Replicas
  4. Work is progressing on the Silva Maco

Work is progressing on the Silva Maco

Started by Firefingers · Sun 2009-05-10 (17 years ago) · in Mako/Maco Replicas

573views
Thu 2011-12-15 (14 years ago)

2Sharks wrote: More

Excellent as usual. Glad you are posting again, it was getting a little sparse around here. This is the way that I was fixing my Motion Kit. Marv, you need to pay attention to this set up! Keep it going!

Window channel build

A very cool soliution and perfect fit.
GREAT WORK.... Keep us up to date.

Greetings
Robert

Report

It goes to the site's admin with a copy of the post. The post stays up.

Fri 2011-12-16 (14 years ago)

Firefingers wrote: Good to be working on her again

It feels good to once again be making some forward progress on the Shark.

I discovered what amounts to a pretty big setback the other day... I had been complaining about the poor finish quality of the gel coat, and put many hours into blocking it down for polyes …

Window channel build

Looks like the Silva style rear window.
Attila has that on his car.
looks awesome!

"Randy"

Report

It goes to the site's admin with a copy of the post. The post stays up.

Tue 2012-03-27 (14 years ago)

Sharkey1807 wrote: Good to be working on her again

Tim,

hope you have somehow the chance to get some money back from this guy. Too bad people try to trick others.

Good luck

BTW: like to see how your Mako is making progress.

Greets Robert

Rear Window Louver update

Howdy all,

Been plugging away at the rear window and louver project for some time now, and just today got to the point where I trial-fit the hinged louver assembly to the sail panel... almost a perfect fit the first time through!

To recap, I cut out the louvered section in such a fashion so that it could be reinstalled in hinged form, to access the rear window for cleaning. I formed a rear window ledge out of L-angle aluminum, and then fiberglassed it into place, long with an aluminum plate for the hinge to mount to.

It's now all roughed in; you can get a feel for the overall look... it will be a factory look, for certain. I still need to add a drain hose to channel water out and away from the undercarriage/gas tank, but that will be very simple. More difficult will be the latch assembly with a remote actuator. I might even use the period hood latches and stikers, but just one. I want to carry the "factory" theme averywhere I can.

Next I'll cut a piece of plywood to shape as a glass template, then have a laminated piece of flat safety glass made.

I love the look of the louvers like this... it's much more like what would actually have come on a production car. I hope you like it, too!

~Tim

Picture posted by Firefingers

Picture posted by Firefingers

Picture posted by Firefingers

Picture posted by Firefingers

Bro' FF

Report

It goes to the site's admin with a copy of the post. The post stays up.

Wed 2012-03-28 (14 years ago)

smrtmblues wrote: More

I am paying attention!!!

I'm getting old and will have trouble seeing out the rear window, especially if it gets dirty, so the clear glass with hinged louvers installed over it sounds like a great way to go.

I'll be interested in what you use for the glass; something out of another car o …

Rear Window Louver update

Sure is looking good Tim. I hope that you are keeping good notes
and great pictures, because when you are done, I'll be turning to
you for lots of information...

If everything goes well, I'll be adding onto my garage soon and the
Mako will come down off the top shelf. What you are doing is appealing
to me to have the full glass with the louvers as a hindged cover.

Keep up the great work and keep us posted...Marv

Last words in fatal accidents for 49 of 50 states are "Oh Sh*t!" Final words in Wisconsin are "Hold my beer, I'm gonna try somethin'..."

Report

It goes to the site's admin with a copy of the post. The post stays up.

Mon 2012-04-09 (14 years ago)

Firefingers wrote: Glass

The channel I'm molding into the rear of the body is flat/planer; just curved at the edges to follow the shape of the teardrop. I'll just be able to use flat safety glass, cut to shap... just make a cardboard template that drops in, take it to the local glass company, and voila, no probl …

Rear Window Louver update

Tim,

came nicely together your rear louver section.
Hope you get soon updates of this part.
Still no clue how mine should be done.

Keep up the great work....

Greetings
Robert

Report

It goes to the site's admin with a copy of the post. The post stays up.

Sun 2012-04-22 (14 years ago)

Firefingers wrote: Rear louver hatch

Progressing on the rear glass/louver area.

Here are pictures of the sail panel with the channel 'glassed in; not completely done but epoxied in place, coverd in mat and resin, and then built up with Duraglass, along with the rivets being drilled out and holes filled.

Ditto o …

Rear Window Louver update

Moving forward... got the hatch opening as it should, got the reveals as close as necessary prior to polyester primer/sealer. Worked on the side scoops a bit more to fine-tune and balance right-to-left; very satisfied at this point.

Reinstalled the rear lower valence after making the mounting tabs wider/heavier and installing threaded inserts for a proper bolt-in fit.

Been working on the removable roof panel over the past few days... will post pics when it's looking right.

Happy Spring, Mako Brothers! :)

Picture posted by Firefingers

Picture posted by Firefingers

Picture posted by Firefingers

Picture posted by Firefingers

Picture posted by Firefingers

Bro' FF

Report

It goes to the site's admin with a copy of the post. The post stays up.

Mon 2012-04-23 (14 years ago)

Sharkey1807 wrote: Rear louver hatch

Tim, just a idea. When you anyway have a aluminum frame in the hatch, maybe you could make a small barel out of aluminum, in the middle of the slats, and fix also the stability of the slats to remain in the same position.

Looks great your idea with the hinges.

Greetings …

Rear Window Louver update

WOW Tim,

that looks fantastic. The louver- and valance-section.
Almost no seam visible. PERFECT

I'm sure none of us would mind when you show also your trial and errors pictures while fabricating the hinges. We only could learn something....wink wink.

Greetings
Robert

Report

It goes to the site's admin with a copy of the post. The post stays up.

Mon 2012-04-23 (14 years ago)

Firefingers wrote: Rear louver hatch

Thanks for the input, Robert!

The latching mechanism, whatever it turns out to be, should serve double-duty in hold the louvers down, and keep them properly centered/positioned on the car.

Fiberglass work is slow-going.... ~Tim

Roof panel progress

Here are a few shots of the roof panel in progress. As some of you may remember, my car began life as a 1971 LT-1 Roadster. The convertible hardtop was cut down and modified into a removable "Targa" top, mounting into the sail panel of the Mako rear clip in back, and the convertible header in front:

Picture posted by Firefingers

Picture posted by Firefingers

Picture posted by Firefingers

Bro' FF

Report

It goes to the site's admin with a copy of the post. The post stays up.

Fri 2012-09-07 (14 years ago)

Firefingers wrote: Window channel build

Progress pics of the rear window channel build; I bought 1" x 1" aluminum angle stock, and cut slits in it to be able to make a curve, and to bend it up/down to form a flat/planar area.

After shaping and fitting, I screwed them to the car to trial-fit. After adjustment, t …

Hinges? Help?

Hey guys,

I have been sloooowly moving forward on my car... I am to the point now where I need to remount the front end, and finish the panel alignment, bodywork, etc.

Can anyone here offer me a turn-key solution for hinges? Randy fab'd some that looked as though they work well; are those now available to purchase?

I'm also thinking that maybe buying "the original" hinges in billet form might work, but I'm unsure exactly what the originals are; most say '57 Chevy truck hinges mounted in reverse, but I can't find a part number on my old ones. They do look like that's what they are, in comparing pictures.

ANY help is appreciated right now... I feel stuck and as though I need to get a custom fabricator out here, but not sure even how well that would turn out.

Bro' FF

Report

It goes to the site's admin with a copy of the post. The post stays up.

Fri 2012-09-07 (14 years ago)

Sharkey1807 wrote: Window channel build

A very cool soliution and perfect fit. GREAT WORK.... Keep us up to date.

Greetings Robert

Hinges? Help?

Hi Tim,

had to search a bit, but finally found the needed numbers.

The hinges which came with my unassembked front seem to be the ones which was used by Silva.

The numbers are all GM numbers which i wrote down from labels of each original GM-package of the pieces.
What you would need:
1 piece 14015975 Hinge LH
1 piece 14015976 Hinge RH
2 piece 1#371940 Spring

Hope this helps you to go further.

Greetings
Robert

Report

It goes to the site's admin with a copy of the post. The post stays up.

Fri 2012-09-07 (14 years ago)

2Sharks wrote: Window channel build

Looks like the Silva style rear window. Attila has that on his car. looks awesome!

Hinges? Help?

Thank you, Robert. According to "the internet," those are GM factory hinges for the following big cars:

Impala, Chevrolet 1977 - 1981 Impala, Caprice with steel hood only.
Oldsmobile 1977 - 1981 Delta, 98.
Buick 1977 - 1978 LeSabre Estate Wagon, Riviera, Electra,
1979 LeSabre Estate Wagon, Electra.
Pontiac 1977 - 1981 Catalina, Bonneville.

It makes much more sense that Silva (and others) would use contemporary hinges, rather than 20-year-old hinges... you have helped; thank you.

Bro' FF

Report

It goes to the site's admin with a copy of the post. The post stays up.

Sun 2012-09-16 (14 years ago) · edited by Firefingers

Firefingers wrote: Rear Window Louver update

Howdy all,

Been plugging away at the rear window and louver project for some time now, and just today got to the point where I trial-fit the hinged louver assembly to the sail panel... almost a perfect fit the first time through!

To recap, I cut out the louvered sect …

Grill and nose progress

Yes, I am still working on my car... I've been contemplating my grill detail for over a year now. I you may recall I built a full-length aluminum grill that I really liked, but it obscured my headlamp treatment (which I love), and it weighed almost 25 pounds... it was a broken nose waiting to happen.

So, over the course of the past few days I've taken that grill apart, shortened the wings so that they follow the edge of the inner headlamps, and removed as much material as I felt I could to lighten the assembly. I'm down to about six pounds now, which is about four more than I'd like, but I can mount it in such a fashion as to distribute the weight throughout the front fiberglass.

I think I may box in the sides next to the headlamps to clean up the look even further... polished leading edge, satin black inside. I like it.

Also, I temporarily mounted my modified front bumper so you can get a look at the entire configuration; again, I like it. I need to change the ends of the bumper to match the body lines before I get it re-chromed, but I think it's looking good.

~Tim

Picture posted by Firefingers

Picture posted by Firefingers

Picture posted by Firefingers

Bro' FF

Report

It goes to the site's admin with a copy of the post. The post stays up.

Sun 2012-09-16 (14 years ago)

smrtmblues wrote: Rear Window Louver update

Sure is looking good Tim. I hope that you are keeping good notes and great pictures, because when you are done, I'll be turning to you for lots of information...

If everything goes well, I'll be adding onto my garage soon and the Mako will come down off the top …

Grill and nose progress

That looks AWESOME !!!!! I should have let you do mine !

Report

It goes to the site's admin with a copy of the post. The post stays up.

Mon 2012-09-17 (14 years ago)

Sharkey1807 wrote: Rear Window Louver update

Tim,

came nicely together your rear louver section. Hope you get soon updates of this part. Still no clue how mine should be done.

Keep up the great work....

Greetings Robert

Grill and nose progress

Tim ,
That is looking outstanding.
I like it very much.
GREAT WORK

Report

It goes to the site's admin with a copy of the post. The post stays up.

Mon 2012-09-17 (14 years ago)

Firefingers wrote: Rear Window Louver update

Moving forward... got the hatch opening as it should, got the reveals as close as necessary prior to polyester primer/sealer. Worked on the side scoops a bit more to fine-tune and balance right-to-left; very satisfied at this point.

Reinstalled the rear lower valen …

Grill and nose progress

bitchin

Report

It goes to the site's admin with a copy of the post. The post stays up.

Mon 2012-09-17 (14 years ago) · edited by Firefingers

Sharkey1807 wrote: Rear Window Louver update

WOW Tim,

that looks fantastic. The louver- and valance-section. Almost no seam visible. PERFECT

I'm sure none of us would mind when you show also your trial and errors pictures while fabricating the hinges. We only could learn something....wink wink.

Greetings R …

Grill and nose progress

Thanks guys,

I'm very happy with the way it looks, but I'm still not 100% certain it maximizes the theme I'm going for with the car... I've got a road-race image in my mind, and may still at least mock up an air box with a mesh grill at the back, and an oil cooler or fog lamps up front.

For street and show, I think this one is right on. Just not sure it's the kind of grill you'd see on a street version of a Le Mans-type race car, which is the look I'm going for. At least right now, lol! :)

Quick-fill cap, knock-off wheels, side exhaust, brake cooling ducts, lowered, front spoiler, etc. Kind of the next-generation /C3 version of the Grand Sport Corvette race cars.

Bro' FF

Report

It goes to the site's admin with a copy of the post. The post stays up.

Wed 2012-09-19 (14 years ago) · edited by Firefingers

Firefingers wrote: Roof panel progress

Here are a few shots of the roof panel in progress. As some of you may remember, my car began life as a 1971 LT-1 Roadster. The convertible hardtop was cut down and modified into a removable "Targa" top, mounting into the sail panel of the Mako rear clip in back, and the c …

Front end

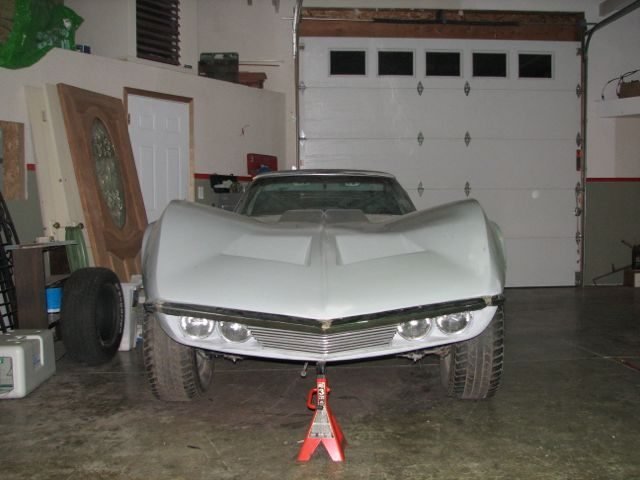
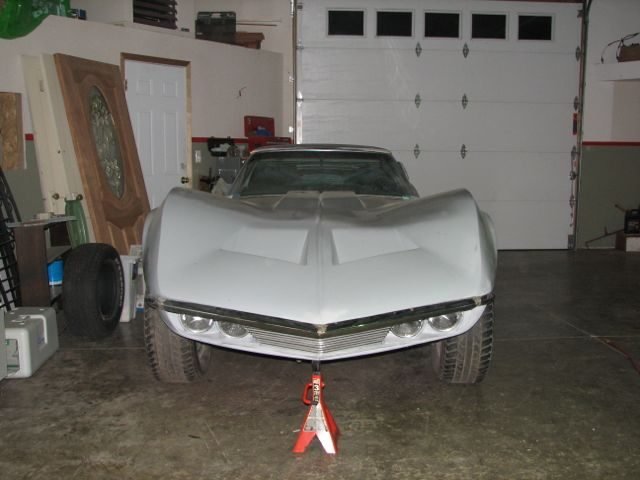
I mounted the grill into the front end by drilling countersunk holes from underneath to accommodate 1/4-20 1 1/2" bolts and 3/4" flat washers. I then drilled from underneath into the lower grill section just enough to mark the three locations (*left, center, right), and then drilled and tapped those locations for the bolts.

I bought some doughnut-shaped rubber grommets that fit around the bolt threads, and bolted the grill to the lower section of the nose, using the thickness of the grommets to both properly orient the grill in the opening, and to provide vibration isolation. It worked perfectly on the first attempt for a change!

After mounting the grill, I located the front end on the car. The engine, trans, and interior are all out of the car, so it is sitting way higher than normal as a result. That said, I aligned the nose with the body, and latched it on just to get an overall perspective on it.

I did install the radiator and surround; it appears that the underside of the front end barely misses the top of the radiator support? Closer than I thought it might be.

One advantage now is that I can see right were my tilt front end pivot point will be... at the lower edge of the steel reinforcement in the nose, and just forward of the frame horn extensions... shouldn't be too difficult to figure out.

I think the grill looks really good in the front end of the car, and after "mounting" the front end back onto the car, I really like the way it looks and will almost certainly keep it, with minor detail changes only.
Picture posted by Firefingers

Picture posted by Firefingers

Picture posted by Firefingers

Bro' FF

Report

It goes to the site's admin with a copy of the post. The post stays up.

Thu 2012-09-20 (14 years ago)

Firefingers wrote: Hinges? Help?

Hey guys,

I have been sloooowly moving forward on my car... I am to the point now where I need to remount the front end, and finish the panel alignment, bodywork, etc.

Can anyone here offer me a turn-key solution for hinges? Randy fab'd some that looked as though they work wel …

Front end

Tim,
the grill does not look just really good as you say.
IT LOOKS FANTASTIC !!!!

Any chance to give a closeup how you fixed the bumper to the frontend.
I too want a front bumper, but still do not know how to fix it that the wight is not hanging just on fiberglass.

Report

It goes to the site's admin with a copy of the post. The post stays up.

Thu 2012-09-20 (14 years ago)

Sharkey1807 wrote: Hinges? Help?

Hi Tim,

had to search a bit, but finally found the needed numbers.

The hinges which came with my unassembked front seem to be the ones which was used by Silva.

The numbers are all GM numbers which i wrote down from labels of each original GM-package of the pieces. What you w …

Bumper

Robert,

The front bumper IS actually just hanging on the fiberglass. I cut all the brackets off the back side, and then welded a stud/bolt to the inside of the front center that goes through the fiberglass. The side returns of the bumper will have a caged bolt so that I can mount them in similar fashion.

I think I'll use a bushing/grommet system (like with the grill) to give some vibration damping and keep the hardware off the paint just a bit. You may be surprised at how light the bumper is without the brackets... five pounds or so? I was thinking I'd need to have one made of aluminum and then polished, but it's really light enough in steel, in my opinion.

Thank you for the comments and encouragement; back at you!

Bro' FF

Report

It goes to the site's admin with a copy of the post. The post stays up.

Sat 2012-09-22 (14 years ago)

Firefingers wrote: Hinges? Help?

Thank you, Robert. According to "the internet," those are GM factory hinges for the following big cars:

Impala, Chevrolet 1977 - 1981 Impala, Caprice with steel hood only. Oldsmobile 1977 - 1981 Delta, 98. Buick 1977 - 1978 LeSabre Estate Wagon, Riviera, Electra, 1979 LeS …

Fender profile work begins

Worked on the car some more today... old-school fabrication is now officially underway! ;)

I had to get the chassis weighted first prior to doing any permanent work, so I went to Home Depot and picked up eight 80# bags of redimix concrete (have a deck addition project coming up). I put some 1 1/8" plywood in the engine compartment over the mounts, and put six bags on top to simulate the weight of the engine and trans... 480# is a bit light, but it's a decent start. Put three more in the passenger compartment to simulate a driver... yikes! Put in a battery, and am calling it good for right now... I figure a passenger, full tank of gas, the interior components, flywheel, clutch, and trans will probably be another 320# or so... figure a half-inch more decrease in ride height.

Re-installed the original hood hinges and cursed them all the way. Had to remove the hood latches because the damned hinges move around so much unlatching it is hit and miss... for my purposes now, I just need the front end in the "right" spot. I got it where I want it, put a set screw in the hinges so they wouldn't move, and put some self-tapping screws through the front end/sides into the cowl to keep it in place.

Pictures show work to that point, as well as the extreme wheel well height, even under load. I plan to move them down about three inches front and rear; any more adjustment can be found in the suspension... I don't want to overdo it.

So, I'll post progress pics as I begin to remove and relocate the wheel well flares. Gonna be fun! :)

Picture posted by Firefingers

Picture posted by Firefingers

Picture posted by Firefingers

Bro' FF

Report

It goes to the site's admin with a copy of the post. The post stays up.

Sign in to reply.

Delete?